
21 lessons104 min
AI Filmmaking & Screenwriting: From Script to Screen
Make a real short film with AI, from the first idea to the final export.
A step-by-step learning path, every button explained on annotated screenshots, 98 answers, and free video courses with 55 lessons. Ask it anything.
The learning path
Five levels, in the order you will use them on a real film. Each step shows the screens with numbered buttons, the exact clicks, the pro habits, the common mistakes, and a short exercise.
Find your way around, create a project, write and structure your script.
 1Tour of ScreenWeaverFind your way around ScreenWeaver in ten minutes: the three tabs, every icon in the header, the sidebar and the shortcuts. 7 min
 2Create your first projectCreate a project, choose between Feature film and Episodical / TV, and pick the aspect ratio your whole film will be shot in. 7 min
 3Write in the script editorWrite a correctly formatted screenplay with Enter, Tab and autocomplete, and turn names into characters, places and objects with a right-click. 8 min
 4Structure with the outlineMap your story as cards, from the title page down to each scene, label the key beats and attach your research, with the script kept in sync. 8 min
 5Import, export and version historyBring an existing script in with the assistant, send it out as PDF, FDX or a full backup, and go back to any earlier draft. 8 min
The AI assistant, your characters, places and objects, and the sheets that keep them consistent.
 6AI Center and assistantWork with the assistant that reads and edits your script and storyboard, and follow every image and video generation from one list. 8 min
 7Characters, places and objectsTurn the characters, places and props of your script into story elements with descriptions a camera can film, the base of every consistent shot. 7 min
 8Reference sheetsGenerate one storyboard sheet and one production sheet per element, check them like a director, and lock them before the first shot. 8 min
Turn the script into shots, compose each one like a director, fix images without starting over.
 9The Storyboard tabChoose your aspect ratio, find your way around the four areas of the Storyboard tab and play your film as an animatic. 7 min
 10Auto-generate a storyboardRun the automatic storyboard generation: sheets, shot breakdown and panels in one window, then review the result like a director. 7 min11Compose a shotDirect a single shot: continuity, shot value, camera movement and action, then generate, compare versions and set its duration. 9 min
 12Fix and edit imagesRepair an almost-right image with Edit with AI, Crop or Camera angle instead of gambling on a new generation. 8 min
The node canvas, image and video generation, scene pipelines, then finishing and delivery.
 13Tour the production canvasFind your way around the Production tab, the node canvas where your storyboard becomes final frames and video. 8 min
 14Generate images and videosMake a final-style frame with an Image node, then animate it with a Video node, choosing the right model, duration, resolution and audio. 10 min
 15Shoot a scene with a pipelineAdd a pipeline to a scene so one video node shoots several shots in a single clip, with the same faces and the same light. 9 min
 16Finish and deliver your filmChoose your best takes, finish and upscale them, get every file out of ScreenWeaver, then build the voices, the sound and the cut in your editor. 10 min
Credits and plans, sharing a project and working together.
Every button, explained
30 screens and 249 controls, from the script editor to the production canvas. Here is the storyboard tab.
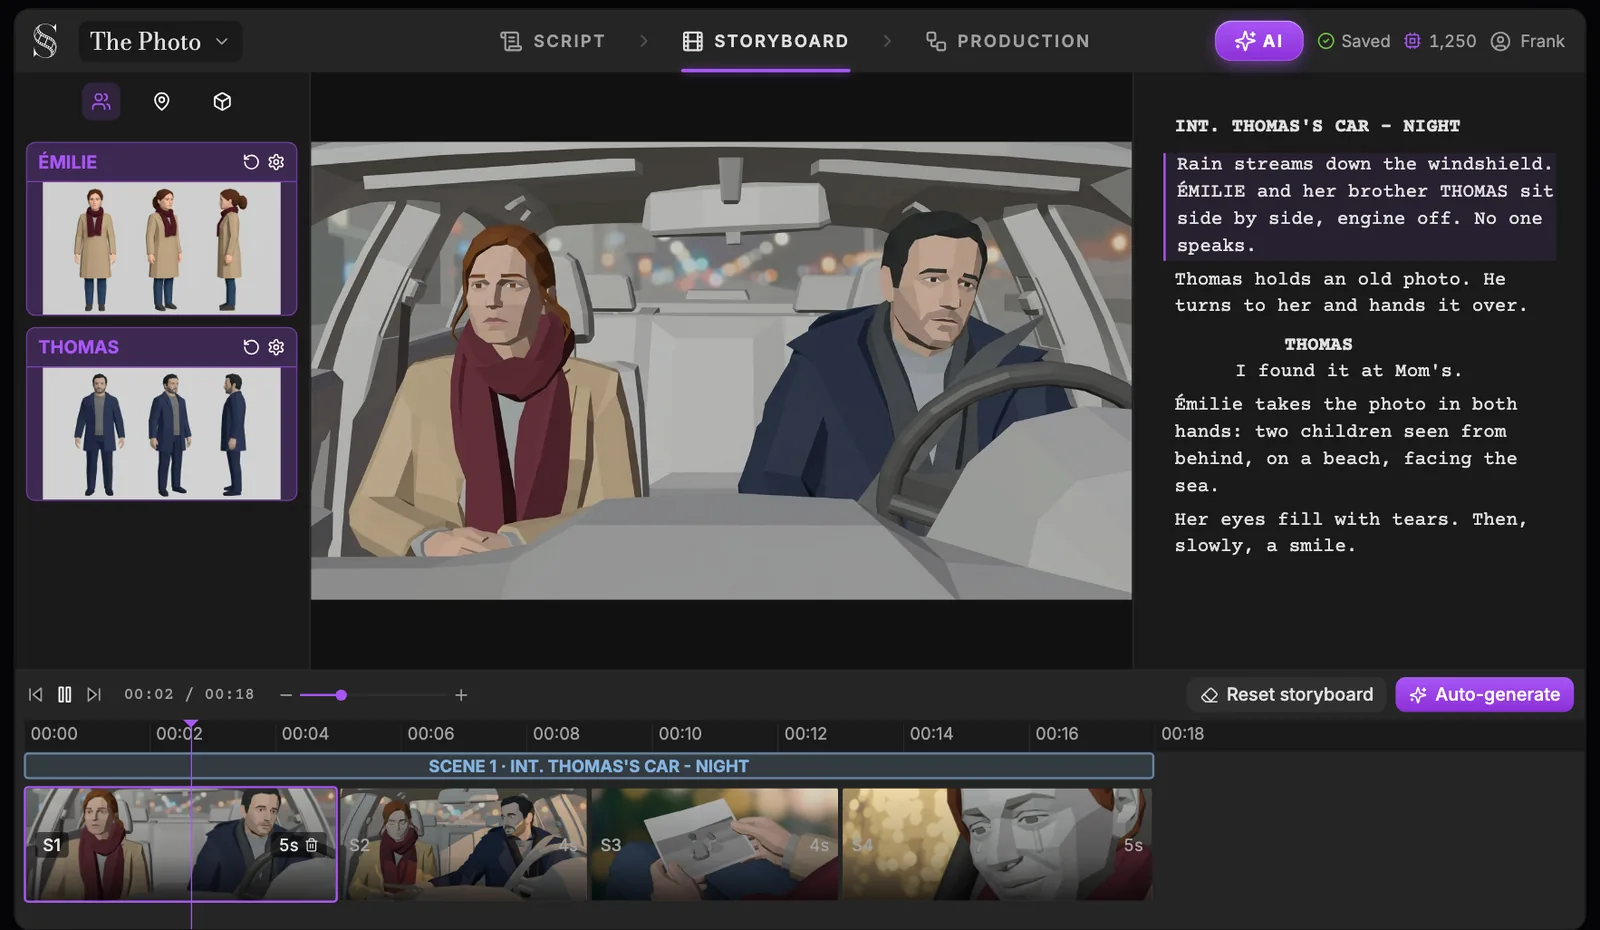
Swipe sideways to see the whole screen.
Free video courses
Full courses, free on YouTube and here, with chapters, takeaways and transcripts for every lesson.
Make a real short film with AI, from the first idea to the final export.
From idea to a finished, professionally formatted screenplay, step by step.
Long-form lessons from beginner to advanced: AI screenwriting, consistent characters, storyboarding, directing shots and cinematic AI video.
See the lessonsFAQ
ScreenWeaver is an online AI filmmaking app that takes one project from screenplay to finished shots. The header holds three tabs in production order, "Script", "Storyboard" and "Production", and each one feeds the next: the storyboard reads your script, and the production canvas is built from your storyboard. The "AI" button on the right opens the "AI Center", home of the assistant and of every generation. Take the full tour of ScreenWeaver.
Click "AI" in the header to open the "AI Center", attach the file with the paperclip in the assistant chat (or drag it in), and ask "Import this script". The assistant reads "PDF screenplays", "Final Draft (.fdx)", "WriterDuet JSON" and "Plain text / any text-based format", and the file picker also accepts .fountain files, up to 15 MB. It rebuilds the scenes and the structure, then creates characters from the cues and places from the scene headings. Walkthrough in Import, export and version history.
It can read and change your script and storyboard: read the outline, a scene or the story elements, search the script, edit the script, create or update shots, import a file and change the aspect ratio. Each action shows in the chat as a line such as "Edited the script" or "Created shots", so you always see what it touched. Ask it to restructure scenes, rewrite a passage or turn pasted notes into a shot list, as shown in The AI Center and assistant.
In the Script tab, click "Story elements" in the sidebar to open their canvas. The same elements appear in the left panel of the Storyboard tab ("Characters", "Places", "Objects") and in the Characters, Places and Objects sections of the Production canvas. Tour in Characters, places and objects.
In the Storyboard tab, click "Auto-generate". The "Automatic storyboard generation" window offers "Run missing entity sheets", "Run empty-scene shots" (the shot breakdown), "Run shot images" and "Run all" to chain them, each with a credit estimate shown before you run it. The sheets come first because every shot image references them; see Auto-generate a storyboard.
It is a node canvas built from your storyboard, already wired. From top to bottom: "Artistic direction", then "Characters", "Places" and "Objects" with their Production references, then "Shot production", where each scene holds shot groups ("Shot S1" and so on) with a Shot node, a "Storyboard panel" and a "Shot production" image node. Tour in The production canvas.
The Video node offers Seedance 2.5 (the default), Veo 3.1, Seedance 2.0, MiniMax H3, Kling v3.0 (i2v, t2v and Motion Control) and Grok Imagine Video 1.5. You switch model in the node itself, so you can compare models on the same inputs without rebuilding anything. Details in Generate images and videos.
Screenwriter is $0 forever (script editor, outline, beats, story elements, export). Auteur is $39.99 a month with 6,000 credits a month, and Studio is $149.99 a month with 25,000 credits a month, real-time collaboration and unlimited seats. Full details on the pricing page and in Credits and plans.
The SIGNAL series
Across the series we build SIGNAL, a cinematic short film, from the first idea all the way to AI-generated video.
7 minThe complete AI filmmaking workflow, from screenplay to storyboard, cinematic shot planning and AI video production. See how a simple idea or finished script becomes a structured film project, and why better creative decisions save both time and AI credits.
Open lesson 1 15 min
Start a film project from nothing more than an idea and develop it with the AI Assistant, or import a screenplay you already wrote (PDF, Final Draft FDX and more) and let ScreenWeaver structure it into acts, sequences, story beats and scenes.
Open lesson 2 11 min
Use AI as a real script consultant: find weak scenes, challenge character motivations, spot contradictions, improve pacing and replace exposition with visual storytelling, while keeping full creative control of your film.
Open lesson 3 13 min
Build character references, locations and props before you generate a single storyboard image, so the same faces, places and objects stay consistent from shot to shot across your entire film.
Open lesson 4 16 min
Turn your screenplay into a complete storyboard, shot by shot: generate frames with AI, choose shot sizes and camera moves, keep continuity across shots, fix wrong generations by changing the direction underneath them, and test pacing with the sequencer as an animatic.
Open lesson 5 12 min
Take a flat first-pass storyboard and direct it like a film: shot sizes, camera angles, composition, depth, eyelines, reaction shots, inserts and camera movement. Same screenplay, same tools, better directing decisions.
Open lesson 6 18 min
Prepare your directed storyboard for AI video generation: write better image-to-video prompts, control camera movement and shot duration, protect character continuity between shots, and diagnose the most common AI video failures before they cost you credits.
Open lesson 7The goal is not to make more content. The goal is to make better films. Open ScreenWeaver next to this page and follow the path, one step at a time.
The videos are in English.